The best way to do animations from blueprints is to use timelines. But, as we know, Timeline is a so-called latent node and it has some limitations. For example, it can't be used inside functions and it breaks Event Receive Draw HUD.
In this tutorial I deal with this problem. The basic idea is to have a separate event that hosts the timeline for our visual effect and talks to the Draw HUD event via local variables.
Let's get started.
1. Setting up the scene
For the tutorial purposes I start from a blank project. Before we jump into scripting, let's make some basic setup for the scene.Add some trigger volumes. We will use them to invoke displaying the messages. You can find trigger volumes under Place/Volumes tab in the Modes interface. I used four 200×200×200 sized box-shaped volumes and placed them in the corners of my map:

You can also add some Print String functions to the level blueprint for testing triggers. Hit Play and make sure that the messages are displayed when you fly over the triggers.

However, Print String is not what we actually want! We want to display nice and big messages that would fade-out over time. Of course we can use 3D text in our scene to do that, but we prefer using HUD, right?
2. Create HUD blueprint
If your level desn't already have HUD blueprint, you need to create one at this point.Under Blueprints tool button, there is an option to create a Game Mode, and once it is created, there will also be an option to create a HUD blueprint. At the moment simply create empty blueprints and name them to your liking. My HUD blueprint has the default name NewHUD.
3. Add a font to your project
We need to add a font asset in order to render text in Unreal Engine.It is good to store your fonts under a special folder in the Content Browser. So click New Folder and name it Fonts.
Right click on Fonts folder in the Content Browser, go to New Asset/Materials & Textures/Font. This will bring up the standard font selection dialog, where you can pick the font you like. I used Arial Bold, size 28.
Keep in mind that font selection dialog measures the size in points (pt) while, it seems, Unreal Engine measures it in pixels. So the dialog's preview will show it wrong sized.
4. Setup local variables in the HUD blueprint
Open your HUD blueprint and add variables as shown in the table below:| Variable Name | Variable Type | Editable | Private | Default Value |
|---|---|---|---|---|
| Message | String | No | Yes | |
| Draw Message | Boolean | No | Yes | False (unchecked) |
| Message Color | LinearColor | No | Yes | #00000000 |
These are auxiliary variables that will allow our timeline talk to our drawing functions, so they should not be exposed to the level designer or other blueprints: uncheck Editable and check Private for all of them. It might be useful to put them into a special category (I call it Local). Also make sure that Replication is set to None. It is all client-side information, the server doesn't need to worry about it.
Default values are not very important with the exception of Draw Message variable, which must be set to False by default.
5. Implement drawing of the message
The drawing of the text must be done only from the Event Receive Draw HUD inside the HUD blueprint's event graph. It will not work anywhere else.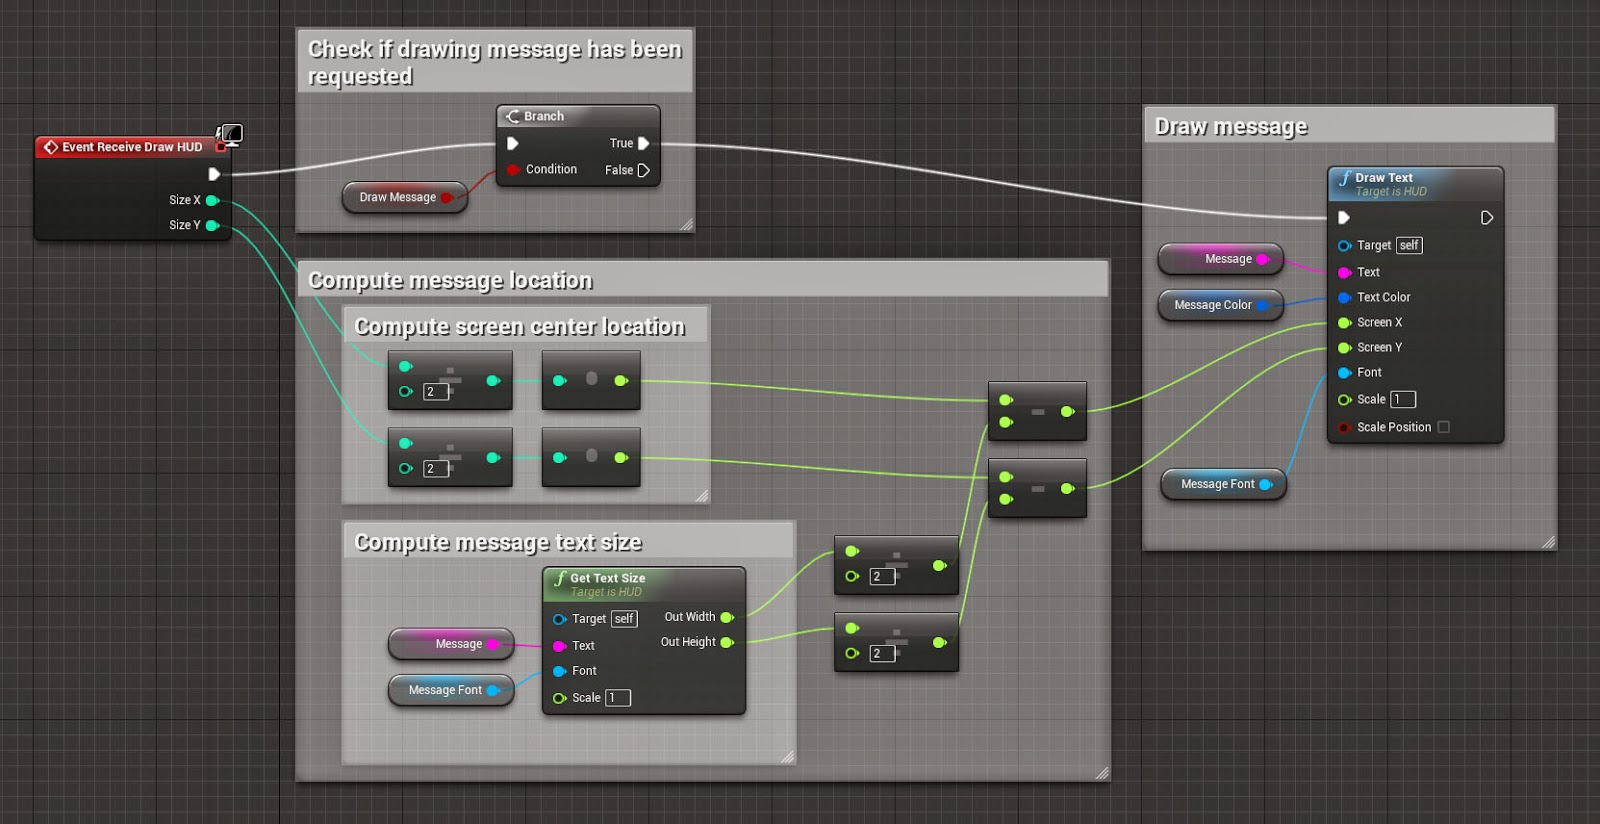
Basically, this is a usual way of drawing of the text. The only difference is that it uses Message and Message Colors variables as inputs and it is guarded by Draw Message flag.
I used the font as an editable variable Message Font, so I could change it in one place if needed. Don't forget to assign your font asset by default.
6. Create Message Color timeline
While still in the event graph of your HUD blueprint, right click, Add Timeline and name it Message Color Timeline. This will be a color animation for your messages. Double-click the timeline node to start editing it.Click Add Color Track, rename it to Message Color and edit to your liking. The most important bit is Opacity. In my timeline, the message stays fully opaque for 1.5 seconds and then fades out to Opacity 0.0 at 2.0s mark. I also added a color transitoin from white to deep red: this will make the message flash when it appears.

7. Create Show Message event in the HUD blueprint
It would be nice to have a function that tells our HUD when to show a message, so this function can be called from other blueprints in our level.
Timelines can't be used inside functions, so we need to create a custom event instead.
In the event graph of the HUD's blueprint, right click then Add Event/Custom Event and name it Show Message. In its Details add new input of the type String and name it Message.
Now you need to connect this event to the Timeline like shown below:

What happens here is: we save the message value, mark that the message needs to be drawn and then proceed to the animation. The animation does not directly manages the drawing, it simply changes the Message Color value. Once the animation is finished, Draw Message is set back to False.
It is important to note that Show Message event replaces the old message with a new one and starts the animation from the beginning. Implementing a message queue is much more sophisticated.
8. Call Show Message from the level blueprint (or anywhere else)
First we need to get the reference to the HUD inside the Level Blueprint. The key nodes here are Get Player Controller, Get HUD and Cast to (Your HUD's blueprint name). I prefer to store it in an auxiliary variable called HUD specific to my HUD's blueprint type, which is in my case NewHUD_C.Usually type casting must be avoided whenever possible, but I couldn't find another way to get access to my custom event.

Now we can replace our previous Print String nodes with Show Message event calls. Since blueprint editor is context sensitive, the easiest way to add these nodes is to add Get HUD variable first then drag a line from its output pin, then type Show Message in the popup menu.

9. Done!
Hit Play and enjoy.
You can also try adding more parameters to the animation like, for example, scaling of the text. You just need to add a local variable for every output of your animation.
No comments:
Post a Comment